Wednesday 15 August 2018

Building a Wildlife Pond

I'm not sure 'building' is the right word for a pond...digging maybe? Anyway, I've been busy this summer trying to whip my garden into shape as it's been neglected in favour of house renovations since we moved in in early 2016. One garden feature I have always wanted was a pond and my kids are finally at the age when I can trust them not to fall head first into it, in theory, so I thought I'd give it a go this summer.

My garden is reasonably large, albeit square and fairly featureless until recently, but I decided I only had room for a fairly small pond. I wanted a simple, natural looking wildlife pond so no fish or electric filters. So one June morning I set to work. The following are progress shots typically taken hurriedly with my phone so the quality isn't great.

2nd June: I decided on where I wanted the pond and made a rough 'kidney' shape with an electric extension lead (all I could lay my hands on!)


I then started digging...


after a while I had removed all of the turf


and I then dug terraces to allow me to place pond plants. The deepest part of the pond is approx 60cm deep

I placed a large piece of plastic on the grass next to the pond on which I put all of the soil that was being excavated


3rd June: the next day I bought a UPVC pond liner, laid it in position and filled with water. Ideally I would have used rain water but this wasn't an option. One of the main challenges I faced was how to hide the edges of the liner to make the pond look as natural as possible. I decided the lift all of the turf around the edges of the pond and to insert the edge of the liner underneath it. In the photo below you can see how the turf has all been cut and lifted. This worked reasonably well although I still wasn't happy with how much liner was visible beneath the turf.


4th June: The following day I bought a selection of pond plants and added some stones and rocks to one end to create a shallow end of the pond and an area in which animals can escape the pond


16th June: A couple of weeks later things are looking a bit more established. I've added some lily pads and more stones and rocks that I scavenged from around the garden. Many of the smaller stones were in the soil that I removed for the pond. I've also planted a wildflower mix directly behind the pond to try to add to the natural feel of this part of the garden.


30th June: Another couple of weeks and things are looking even more established. I had to ensure that I kept the turf around the pond well watered in the hot weather as some of it was sitting on top of the pond liner and hence was prone to drying out.


8th July: I still wasn't happy with how much of the pond liner was visible beneath the turf and so I decided to lift the turf again and to bring it forward a few inches so that it sloped over the edge of the visible pond liner and, in places, touched the pond water. My thinking was this will not only make the pond look more natural but will also keep the turf damp. I then added some soil in the cavity behind the turf and added some grass seed to it. In my view this has worked really well and it's really starting to look natural and established only a little over a month after the pond was started.


 15th August: Fast forward to today and I've now added a seating area behind the pond. The plants are all very established as are the wild flowers behind the pond. I'm really pleased with how it has developed and can't quite believe the transformation in two and a half months.


I haven't seen much by way of insect life in the pond but I'm really pleased to have seen a number of frogs. They're quite evasive at the moment but a tiny one did pose for me last night in semi-darkness allowing me to take the photo below. It's nothing special but it's significant as it's the first image I've taken of my new pondlife!


Canon 1D mkIV and Sigma 150mm macro, 1/15, f 2.8, ISO 1600:


Monday 13 August 2018

Bee Flies

I'm a bit slow updating this blog but I will try to keep it ticking over. Here are a few images of a Bee Fly feeding on flowering redcurrant in my garden from back in the spring.

I may have mentioned previously that I'd never seen Bee Flies in and around my Leicestershire patch at all until I moved 13 doors up from my previous house and have now had them in my garden for 2 years running! They're amazing looking insects. These images were taken handheld using a Canon 1D mkIV with Tamron 60mm macro lens and an MT-24EX flash.

PLEASE CLICK TO ENLARGE IMAGES


Monday 7 May 2018

Photomicroscopy: Different image styles

I mentioned in a previous post that I have been using a microscope quite a lot in recent months and have been very much enjoying taking different styles of photograph. I was playing around with some images earlier and thought I'd put them together in a composite to show just some of the different optical techniques that are used within microscopy and how they can result in quite different looking images.

The subject here is a type of rotatoria, a tiny aquatic organism. This one is 0.3mm wide and in each photo it has been photographed at 160x magnification using an Olympus OM-D E-M1 and a Zeiss GFL microscope.

PLEASE CLICK TO ENLARGE IMAGE


The top left image is taken using a technique called Variable Amplitude Contrast (VAC), top right was taken with traditional brightfield, bottom right was taken using phase contrast and bottom left was taken using darkfield.

The same subject, the same camera and microscope, but 4 different ways of viewing the subject which all result in very different looking images.

Sunday 8 April 2018

Outdoor Photography Article

I'm very pleased to have a 7 page guide to insect macro photography in the latest (May) issue of Outdoor Photography magazine.

The article provides some pointers on learning about your subject, technique and composition, using flash and wideangle macro. There's also some info on equipment.

(iPhone images below)


Sunday 1 April 2018

Microscopy

Having had a long-standing interest in insect macro photography I have often been tempted to take the next step and to examine and photograph microscopic life. However one of the main reasons I didn't was because of my erroneous belief that there was little scope for creativity in photo microscopy or much potential to take different styles of photograph.

Back in the Autumn I was very kindly given a book on microscopy which made me realise that, actually, there are a variety of ways to photograph microscopic life and plenty of scope for different lighting and other photographic techniques. Fast forward a few months and quite a lot of background reading and I became the proud owner of a 1960s Zeiss GFL microscope stand with a trinocular head (meaning a camera can be attached without having to remove the binocular eyepieces) and a selection of good quality Zeiss objective lenses. Although a vintage model (and older than I am!) the Zeiss GFL that I bought is in excellent condition, is superbly built and works as well as the day it was made. It also has very attractive 1960s styling which provides a nice contrast to my Olympus E-M1 which I can connect directly to it.

PLEASE CLICK TO ENLARGE IMAGES

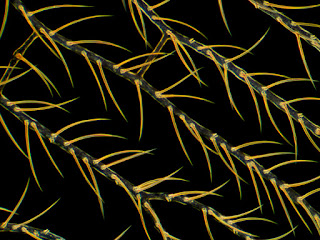
The hairy wing veins of a Green Lacewing (from an old prepared slide that I borrowed). Zeiss GFL, 100x magnification, dark field


A benefit of my Zeiss GFL is that it is capable of three different styles of image: (1) is 'standard' so-called brightfield where the image has a white background (2) is known as dark field where a black background is achieved and the subject is side lit which provides a very different image to bright field  and (3) so-called phase contrast which provides a pale to mid grey background and the subject is normally shown with a lot of contrast which helps to pick out detail.

An iPhone image of my Zeiss GFL with trinocular head and Olympus OMD E-M1 attached. Note that I also connect the E-M1 to my iMac (which also sits on my desk) and can view the image directly on the iMac screen. This makes fine focusing much easier.


I have bought a number of prepared slides to view through the microscope, some, unbelievably, dating back to the 1860s, and have also made some of my own (temporary) slides viewing the life in standing water in my garden. It's a bit of a cliche but microscopy really does open up another world and I've very much enjoyed building my knowledge and skills over the last few months - though I still have a lot to learn.

Below are some of my favourite images taken so far.


Pine pollen composite, Zeiss GFL, 400x, darkfield, most were stacked
 from 2-4 frames in Zerene Stacker (ZS)


A section of a young pine cone showing individual pollen grains, Zeiss GFL, 100x, 
2 shots stacked in ZS, darkfield

An individual diatom (a type of microalgae with amazingly detailed shells). Zeiss GFL, 400x, Phase Contrast and stacked from 6 frames in ZS

An individual radiolarian (a type of microscopic protozoa, again with amazingly detailed shells). Zeiss GFL 400x Phase Contrast, 20 frames stacked in ZS


Filamentous algae Oedogenium. Zeiss GFL, 400x, Phase Contrast, 14 frames stacked in ZS


Pine pollen, Zeiss GFL, 400x, Phase Contrast, 4 frames stacked in Zerene Stacker (ZS)

Polypodium (fern) rhizome, Zeiss GFL, 160x, brightfield


A composite image of Diatoms. Zeiss GFL, 400x, darkfield, some diatoms stacked in ZS


A cross-section of a pine needle, Zeiss GFL, 100x, brightfield

finally, another single diatom, Zeiss GFL, 400x, Phase Contrast, 6 frames stacked in ZS


Tuesday 14 November 2017

Marbled White Butterflies

The summer feels a distant memory but here are some images of a trip to Ryton Wood Meadows from back in July. This site is always good for Marbled White butterflies and so I try to manage one visit per year given the lack of nearer Marbled White sites.

As usual, I was keen to include the butterflies' habitat within the images so used a combination of my Laowa 15mm macro and Tokina 35mm macro lenses for many images.

PLEASE CLICK TO ENLARGE IMAGES

The first is perhaps my favourite image of the session (Tokina 35mm):


I was lucky enough to find a mating pair of butterflies. This image was taken with the Laowa 15mm lens:


while this came from the Tokina 35mm. The breeze had got up by this point was was catching the butterflies' wings:


here's a more conventional shot taken with my Tamron 60mm lens:


finally, here's one taken with my Olympus O-MD E-M1 and Olympus 60mm macro:


Saturday 7 October 2017

Spiders in BBC Wildlife Magazine

I'm very pleased to have a couple of images, including a double page spread, in the October issue of BBC Wildlife magazine illustrating Adam Hart and Anne Goodenough's article on House Spiders. One image is a close up of a House Spider's eyes, the other (the double page spread) is a wideangle image of a Tegenaria sp. spider in my kitchen (using my Laowa 15mm macro lens).


PLEASE CLICK TO ENLARGE IMAGES


Here's the uncropped version of the image:


and here's a few more from the same session: