Wednesday 28 September 2011

Ants and Aphids

I mentioned in a previous post that I find the behaviour of ants fascinating. One particular aspect of their behaviour that interests me is their relationship with aphids. The two species have a symbiotic relationship - the ants protect the aphids from predators and in return secrete globules of sugary honeydew from their abdomens which the ants lap up.

Whenever I find a group of aphids I look out for the ants, which are never far away, and try to capture the interactions between them. This presents a number of challenges. The ants in the images below are Black Ants (Lasius niger) and are approximately 4-5mm in length. The aphids are even smaller, so at this level of magnification depth of field is miniscule, approximately 0.3mm (yes that's 0.3 of a millimetre!) . However, what makes the task most difficult is the fact that the ants rarely stand still. They are constantly on the go, clambering over the aphids and continually stroking them with their antennae to encourage them to release globules of honeydew.

I photograph high magnification subjects such as this handheld and light the image entirely with heavily diffused flash to remove motion blur. Given the extremely shallow depth of field and the 'dynamic' nature of the subject matter the use of a tripod would not be practical. Instead, I grip the leaf or stem that the ants are on in my left hand and rest the end of the lens on that left hand for stability. The lens and subject then move as one. The short working distance of the MP-E 65mm macro lens (around 3 or 4cm at this magnification) obviously lends itself to this technique.

Just occasionally the ants will pause for a second allowing me to move the sliver of the frame that is in focus over the eye of the ant. I also need to try to ensure that the aphid or aphids are also within the depth of field. Perhaps not surprisingly it can take a lot of patience and I regularly suffer from aching arms and a sore hand from where the end of the lens digs in.

Unfortunately, I've had very few aphids in my garden this year and only had one attempt to capture the interaction between ants and aphids on a stay with family in Essex (and, yes, my mother-in-law did look on with much amusement as I sat on her lawn with my head on a rosebush as dusk fell around me..). The frame below was the best of the session and shows a Black Ant desperately trying to encourage an aphid on a rose bush to secrete some honeydew. The ant was repeatedly stroking the aphid from the rear with its antennae and eventually resorted to putting its front legs on the aphid's back. The ant left empty-handed after a few seconds and moved on to another aphid.

PLEASE CLICK ON IMAGES FOR LARGER VERSIONS

Canon 60D with MP-E 65mm macro lens, f13, 1/160, ISO 100, diffused MT-24EX flashgun.


In previous years I've taken a number of images of ants and aphids. The image below was Highly Commended in the 2010 Wildlife Photographer of the Year competition and entitled (by them, not me :-)) 'The Ant Shepherd and its Little Flock':


here's another example:


The real challenge when shooting these is to capture a drop of the honeydew in the image. This is particularly difficult because the second it appears an ant picks it up with one of its antennae and puts it in its mouth. To date I've only managed 2 images where the honeydew is visible and in focus. In the image below the ant has it in its mouth and is just about the swallow it - shame about the out of focus ant in the foreground...


and in this one the ant is about to whisk the honeydew into its mouth with its antenna.


...unfortunately, it's not the best composition. I'll no doubt try again next year.

Friday 23 September 2011

Fungi Photography Guide

The latest (October) issue of Digital SLR magazine contains a guide to photographing fungi written by myself and containing a selection of my fungi images. The magazine is aimed at relatively inexperienced photographers with only fairly basic equipment and so it was written with that audience in mind. The article provides basic advice on how to find fungi as well as tips on composition, lighting etc.

PLEASE CLICK ON IMAGE TO ENLARGE


Tuesday 20 September 2011

Marbled White Butterfly

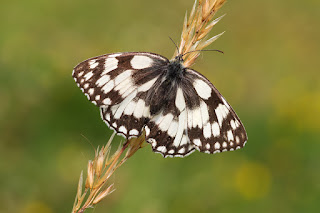
Earlier in the summer I paid a brief visit to Ryton Woods in Warwickshire with the hope of photographing Marbled White butterflies. These striking butterflies do not occur in many places in the Midlands and the only time I have previously photographed them was in Kent, where they are far more numerous. I intentionally chose a cool morning to increase my chances of finding an approachable butterfly and my luck was in. I soon found a single individual perched with its wings closed next to a path. I approached very cautiously, not knowing whether it would take flight as I moved closer, but luckily it sat motionless. I therefore got to work and attached my plamp to the stem on which it was perched and moved my tripod into place.


PLEASE CLICK ON IMAGES TO VIEW  LARGER VERSIONS

Canon 7D with Sigma 150mm lens, f7.1, 1/250, ISO 400


After a while the sun started to break through and the butterfly began to open its wings to warm them. Before long it decided to flutter a little further down the path before settling again. Fortunately, the sun kept going in which prevented the butterfly from warming up too much. As a result, whenever it settled it was still quite approachable but the breaks in the cloud at least allowed me to photograph the butterfly with its wings open.


Canon 7D with Sigma 150mm lens, f13, 1/200, ISO 200


Canon 7D with Sigma 150mm lens, f7.1, 1/400, ISO 200


Finally, I always carry my fisheye lens with me as I love to take 'wideangle macro' type shots showing an insect's environment. Such shots are very difficult to take (the lens was almost touching the butterfly!) but can be quite effective.


All in all, I was pleased with these images. I was at the site for less than 2 hours but managed to get the images I wanted. If only that happened more often....

Saturday 17 September 2011

Woof woof

Is it just me or is there something rather dog-like about this weevil? I think it's the snout. I've always thought that weevils can be very photogenic, almost cute perhaps, and I often keep an eye out for them as a result. This one, I think, is a Pea Weevil (Sitona lineatus), approximately 5mm in length.

Photographed using a Canon 60D with Canon MP-E 65mm macro lens, f11, 1/160, ISO 100, with diffused MT-24EX flashgun.


PLEASE CLICK ON IMAGES FOR LARGER VERSIONS


Tuesday 13 September 2011

Insect Macro Photography Hints and Tips

[updated April 2017]

Whether you're using a dedicated macro lens, close-up lenses, DSLR or compact, the following basic principles apply when photographing insects.

(1). Make eye contact.

An insect image will have far greater impact if taken at eye level. Most insect images taken from above typically lack impact (although they may be useful for ID purposes). Here are some examples of eye-to-eye contact:

PLEASE CLICK ON ALL IMAGES TO VIEW LARGER VERSIONS:

Crab Spider (Canon 7D with MP-E 65mm macro lens and MT-24 flash, f14, 1/160, ISO 100)


A small Jumping Spider (Canon 7D with MP-E 65mm macro lens, f11, 1/160, ISO 100)


Horsefly (Canon 60D with Canon MP-E 65mm macro lens, f13, 1/160, ISO 100)


Finally, a Lesser Marsh Grasshopper that looks like it's wondering what on earth I'm doing  (Canon 7D with Sigma 150mm macro lens, f9, 1/100 sec, ISO 400):


(2). Maximise depth of field.

When the subject matter is highly magnified, as it often is when photographing insects, the depth of field becomes extremely shallow. In order to get as much of the insect as possible in focus it is therefore necessary to use as small an aperture as possible. If this still does not result in the entire insect being in focus then the usual trick is to focus on the insect's eye. However, one way of helping to ensure that the whole insect is in focus is to photograph the insect side-on, so that the insect is parallel to the front of the lens. This is particulartly effective for butterflies with their wings closed and for long insects such as damselflies and dragonflies.

Mayfly (Canon 7D with Sigma 150mm lens, f10, 1/25, ISO 400):


Lacewing (Canon 40D with Sigma 150mm lens, f13, 1/4 sec, ISO 200):


Male Banded Demoiselle Damselfly and Bluebottle Fly (Canon 7D with Sigma 150mm lens, f8, 1/125, ISO 400):


(3). Pay close attention to the background

Insect images typically look best if the insect is isolated against a clean background. It is therefore important to (a) try to get your subject as far away from background foliage as possible and (b) to use just enough depth of field to ensure the insect is in focus but no more than that or else the background is more cluttered than it needs to be.

Achieving (a) above, can sometimes be down to luck. Occasionally you will find a dragonfly, for example, that just happens to be on a reed or other perch with some clean space between it and the background. On other occasions you have to make your own luck by bending the perch away from the background or bending the background foliage out of sight. A good tool to help with this is a Plamp, which is basically a flexible arm with a crocodile clip at each end. One end is fixed to your tripod (or a second tripod) and the other attaches to the insect's perch. Not only does it hold the perch steady (crucial at slow shutter speeds) but it does often allow the perch to be angled away from foliage. 

Achieving (b) above is a matter of choosing the right aperture. If the front of the lens is parallel to a relatively flat insect then it is possible to get all of the insect in focus at a large aperture such as f5. This will very much help to ensure that the background is nice and clean. If it's not possible to move an insect's perch away from background clutter then this is often the only option. But it does require a relatively flat insect such as a butterfly with its wings closed or a dragonfly/damselfly from the side. Here are a couple of examples, note the large aperture used in each:

Large White Butterfly (Canon 40D with Sigma 150mm lens, f5, 1/400 sec, ISO 400):


Banded Demoiselle, female (Canon 40D with Sigma 150mm lens, f6.3, 1/200, ISO 200):


In both cases, by very carefully aligning the front of the lens so that it was parallel with the insect I was able to use a large aperture (f5 and f6.3) which provided very limited depth of field and hence resulted in a nice clean background. If the lens were not perfectly parallel with the insects a smaller aperture of f9 or 10 would have been needed which would then have introduced detail into the background.

More generally, also pay attention to the colour of the background. Sometimes it's necessary to take an image and look at it through the viewfinder to see how the colours look. In the two images below, for example, I purposefully shot towards a field of buttercups to provide a yellow background to complement the colours of the dragonfly and damselfly:

Four-Spotted Chaser (Canon 7D with Sigma 150mm lens, f13, 1/160, ISO 400):


Blue-Tailed Damselfly (Canon 7D with Sigma 150mm lens, f7.1, 1/125, ISO 400):


Five-Spot Burnet Moth and Cocoon (Canon 7D with Tokina 35mm macro lens, f14, 1/80, ISO 400):


(4). If using natural light, don't shoot in full sun

Not a great deal more needs to be said on this point. Full sun will tend to result in harsh highlights and deep shadows and generally provides less attractive macro images. Better results will be achieved shooting in cloudy conditions since the cloud softens the light by acting in the same way as a flash diffuser. Speaking of flash... 


(5) Don't be afraid to use flash

Some photographers prefer to use only natural light for macro work on the basis that the use of flash can make the image look artificial. Although this can be true if too much flash is used or if it isn't diffused well, flash does have a number of benefits. Firstly, it allows a smaller aperture to be used and hence provides greater depth of field ; secondly it picks out detail and hence can provide sharper-looking images; thirdly, given some insects' preference for lurking in the undergrowth, it provides photographic opportunities which simply wouldn't have existed if flash were not being used; finally, if lighting an image entirely by flash, the very short duration of the flash acts in the same way as a very fast shutter speed and can remove motion blur.


Although most of my images taken with the Sigma 150mm lens do use natural light alone, all of my images taken with the MP-E 65mm macro lens are lit entirely, or partly, with flash. I also tend to use my Canon 60mm lens with flash. The reason these 2 lenses lend themselves to flash use is because they have very short working distances (the distance between the end of the lens and the subject) which means it is possible to bend a heavily diffused flash gun into position so that it is very close to the subject. This is crucial to prevent harsh light. The larger the diffuser and the closer it is to the subject, the more natural looking the flash light will appear.


In terms of flashguns, the options are an external flashgun on a side bracket (e.g. a Hakuba L-H1 flash bracket, available from Ebay, which has a ball head) or a dedicated twin-head macro flashgun such as the Canon MT-24EX. Home-made diffusers are fairly easy to construct, although for an external flashgun an adapted lambency diffuser (again, see Ebay) works well. The adaptations I used to make were to cover the front with kitchen towel, to cover the sides with kitchen foil and then to tape over the kitchen foil to keep it in place. I currently use the Canon MT-24EX and THIS POST describes how I diffuse it (as well as the lambency diffuser). 

The images below were lit entirely with flash.

Male Tawny Mining Bee (Canon 60D with MP-E 65mm macro lens, f14, 1/160, ISO 100, diffused MT-24 flashgun):


Seven Spot Ladybird (Canon 5D with MP-E 65mm macro lens, f13, 1/160, ISO 400, diffused Canon 580EX flashgun):


Hoverfly (Eristalinus sepulchralis) (Canon 7D with MP-E 65mm macro lens, f13, 1/160, ISO 100):


(6). Try using a mix of flash and natural light

When lighting an image entirely with flash you will always get a black background unless you are very careful to ensure there is some foliage or petals in the background very close to the subject. Sometimes, however, it can be desirable to illuminate the subject matter using a diffused flashgun (in order to gain from greater depth of field and to freeze movement) but to allow natural light into the background. In some ways this technique provides 'the best of both worlds.' When shooting in this manner I will normally use aperture priority and will dial in -11/3 (one and one third) or even -1 2/3 (one and two thirds) negative flash exposure compensation to ensure the flash isn't too strong.

I tend to use this technique most when the sky is deep blue as I have a bit of a thing for blue skies in images! Here are a couple of examples, the first taken with the MP-E 65mm lens and the second with the Canon 60mm lens.

Small Tortoiseshell Butterfly (Canon 60D with Tokina 35mm macro lens, f13, 1/200, ISO 400, diffused MT-24 flashgun):


Ladybird (Canon 5D with MP-E 65mm lens, f11, 1/200, ISO 400, diffused MT-24 flashgun):


Tawny Mining Bee (Canon 60D with Canon 60mm macro lens, f11, 1/250, ISO 400, diffused MT-24 flashgun):


(7). Capture interesting behaviour or action

Images are often more interesting if they contain some natural behaviour or action rather rather than merely a static insect. Here are a few examples.


A Ladybird taking off (Canon 60D with Canon 60mm macro lens, f16, 1/160, ISO 100)


Here a Black Ant is 'herding' aphids in order to milk them for their honeydew (Canon 450D with MP-E 65 macro lens, f10, 1/160 sec, ISO 100):


Secondly, this Dung Fly is about to devour a smaller fly that it has caught (Canon 30D with MP-E 65 lens, f14, 1/160 sec, ISO 100):


This Large Red Damselfly is transforming from its aquatic nymph stage into an adult damselfly (Canon 7D with Sigma 150mm macro lens, f13, 1/100, ISO 400):


Finally, this Black Ant is stopping for a drink on a foxglove (Canon 60D with MP-E 65mm lens, f10, 1/160, ISO 100):


Seven Spot Ladybird eating Aphids (Canon 60D with MP-E 65mm macro lens, f13, 1/160, ISO 100):


(8) Capture the insect's environment

Most of the above shots show the insect in isolation from its surroundings. Sometimes however, including the insect's environment can provide a more interesting image. A wide angle lens with close focussing ability, or a fisheye lens, are the best lenses for this sort of shot and it works best with fairly large insects. 

Common Darter (Canon 60D with Laowa 15mm macro lens, aperture not recorded, 1/160, ISO 200):


A Brown Hawker dragonfly (Canon 7D with Tokina 10-17mm fisheye lens, f11, 1/640, ISO 400):


A Marbled White Butterfly (Canon 7D with Tokina 35mm macro lens, f14, 1/320, ISO 200)


Common Blue Butterfly (Canon 7D with Tokina 35mm macro lens, f20, 1/200, ISO 400):


Brown Lipped Snail (Canon 60D with Laowa 15mm macro lens, aperture not recorded, 1/160, ISO 400):


Blue-Tailed Damselfly (Canon 60D with Laowa 15mm macro lens, aperture not recorded, 1/250, ISO 200):


Note: if you're interested in wide angle macro you may wish to read this post on this topic as well as my review of the Laowa 15mm macro lens.


(9). If your equipment allows, why not try high magnification macro? 

Although a lens such as the Canon MP-E 65mm is ideal for this sort of image, you don't have to break the bank to shoot high magnification images. Try reversing a basic 50mm lens (you can get adapters to fit the reversed lens to the camera) or try extension tubes on a macro lens (the smaller the focal length of the macro lens the greater the effect of the extension tubes) or try clipping a Raynox DCR-150 or DCR-250 close up lens onto a macro lens. 

Obviously the greater the level of magnification the shallower the depth of field, so some care is needed to ensure that the insect's eye is in focus. Here are some examples;

This tiny Globular Springtail is around 2mm in length and was here photographed wondering around a frost covered rock in the middle of winter (Canon 40D with MP- E 65 lens, f9, 1/160, ISO 100):


Common Field Grasshopper (Canon 7D and MPE-65 lens, f3, 1/160, ISO 100):


Crab Spider (Canon 7D with Canon MP-E 65mm macro lens, f10, 1/160, ISO 100):


Nomada Bee (Canon 7D with MP-E 65mm macro lens, f13, 1/160, ISO 100):


All comments welcome, particularly if you have found any of the above helpful or if you would like me to clarify any points.

Sunday 11 September 2011

Cinnabar Moth Caterpillars

These striking orange and black striped caterpillars are a familiar sight in mid summer, most commonly found feeding on ragwort and often in large numbers. I thought I would try something a little different by photographing them against a blue sky using a mix of flash and natural light (as described in Ladybird Take-off, below). I took the first shot from the ground looking up, which gives a strange perspective, while the second is perhaps a bit more conventional.

PLEASE CLICK ON IMAGES TO VIEW LARGER VERSIONS


Finally, a full flash shot. These images clearly show how effectively these caterpillars strip the foliage from the ragwort.


All shots taken with a Canon 60D with MP-E 65mm macro lens and a heavily diffused MT-24EX flash gun. I may do a post on my diffusion soon.


Thursday 8 September 2011

Website Updated

23 new images have been added to my main website.

These include a mating pair of Blue-Tailed damselflies, a Banded Demoiselle damselfly, Small Skipper butterflies, an Ichneumon wasp, Harlequin ladybirds and many others. These images can be found in the Latest Images gallery and in the appropriate sub-galleries within the Insects gallery.

Here are a few of the new images (PLEASE CLICK FOR LARGER VERSIONS):


Male Banded Demoiselle


Blue-Tailed Damselflies mating


Small Skipper and Bee


Ichneumon Wasp